Receipt Capture
Keep your receipts organized by capturing them in Curl Budget. Receipts are automatically processed to extract merchant, amount, and date information, then matched to your imported transactions.
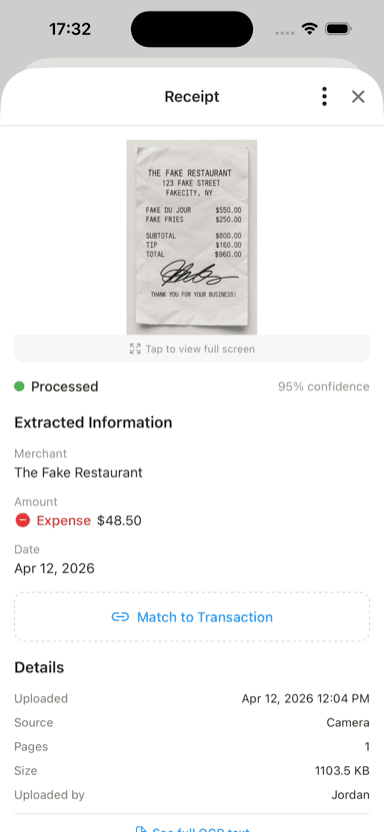
Captured receipt with extracted merchant, amount, and date
Why Capture Receipts?
Tax Documentation
Keep digital copies of tax-deductible expenses:
- Business expenses
- Medical receipts
- Charitable donations
- Home office purchases
Use tags like tax-deductible or business-expense to organize.
Return Tracking
Save receipts for items you might return:
- Major purchases
- Gifts with uncertain sizing
- Electronics with warranties
Expense Verification
Have proof of purchases when needed:
- Reimbursement requests
- Warranty claims
- Dispute resolution
Capturing a Receipt
From the Stream Screen
- Tap the "+" button
- Select "Capture Receipt"
- Choose your capture method:
- Take Photo - Use your camera to photograph a receipt
- Choose from Library - Select an existing photo or screenshot
Using the Camera
When you select "Take Photo":
- Position the receipt within the viewfinder
- The camera will auto-focus and enhance:
- Automatic cropping to receipt edges
- Perspective correction
- White balance adjustment
- Contrast enhancement
- Capture the image
- Review and confirm
From Screenshots
Perfect for digital receipts:
- Screenshot an email receipt or online order confirmation
- Open Curl Budget
- Tap "+" then "Capture Receipt"
- Select "Choose from Library"
- Pick the screenshot
Automatic Processing
After capturing, Curl Budget automatically:
OCR Extraction
Extracts key information from the receipt:
- Merchant name - Who you paid
- Amount - Total purchase amount
- Date - When the purchase occurred
- Order number - For tracking (when present)
Transaction Matching
Searches for matching imported transactions:
- Looks for similar amounts (within tolerance)
- Compares dates (within a 7-day window)
- Matches merchant names using fuzzy matching
If a match is found, the receipt links to that transaction. If no match exists, Curl Budget creates a receipt-based transaction that appears in your transaction list.
Receipt Status
After upload, receipts show their current status:
| Status | Meaning |
|---|---|
| Pending | Waiting for OCR processing |
| Processing | OCR extraction in progress |
| Matched | Linked to an imported transaction |
| Unmatched | No matching transaction found (receipt-based transaction created) |
Viewing Receipts
From Transaction Details
Transactions with receipts show a receipt indicator in the transaction list. To view:
- Tap any transaction
- Look for the receipt badge
- Tap "View Receipt" to see the image
Using the Receipt Filter
To see all transactions with receipts:
- Go to the transaction list
- Tap the filter icon
- Enable "Has Receipt"
This shows both matched transactions and receipt-based transactions.
Searching by Receipt Content
You can search for text that appears on your receipts:
- Item descriptions
- Store addresses
- Order numbers
- Any text the OCR extracted
Use the search bar on the transaction list to find receipts by their content.
Receipt-Based Transactions
When no matching imported transaction exists, Curl Budget creates a receipt-based transaction:
- Appears in your transaction list like any other transaction
- Includes all extracted information (merchant, amount, date)
- Fully functional: assign categories, add tags, include in budgets
- AI categorization works automatically
If the bank transaction later imports and matches:
- The receipt links to the imported transaction
- The receipt-based transaction is hidden (to avoid duplicates)
- All your categorization carries over
Manual Matching
If automatic matching doesn't find the right transaction:
- Open the receipt (from an unmatched transaction)
- Tap "Match to Transaction"
- Browse candidate transactions
- Select the correct one
Unlinking a Receipt
If a receipt was matched incorrectly:
- Open the transaction with the receipt
- Tap "View Receipt"
- Tap "Unlink"
The receipt-based transaction becomes visible again.
Tax Notes
Add notes to receipts for tax purposes:
- Open a transaction with a receipt
- Tap "View Receipt"
- Scroll to "Tax Notes"
- Add relevant information:
- Business purpose
- Client/project name
- Expense category for accounting
These notes are searchable and included in exports.
Best Practices
Capture Promptly
The sooner you capture:
- Better chance of automatic matching
- Receipt paper doesn't fade
- Fresh memory of purchase context
Good Lighting
For paper receipts:
- Use natural or bright indoor light
- Avoid shadows across the receipt
- Flatten crumpled receipts before capturing
Complete Capture
Ensure the full receipt is visible:
- Include the total amount
- Capture merchant name/logo
- Include date if visible
Use Tags for Organization
Create tags for common receipt purposes:
tax-deductiblebusiness-expensemedicalreimbursablewarranty
Apply to receipt transactions for easy filtering at tax time.
Storage and Limits
Storage
- Receipts are stored securely in encrypted cloud storage
- Images are compressed for efficient storage (max 2000px dimension)
- Original quality preserved for readability
Rate Limits
To ensure service quality:
- 10 receipt uploads per minute
- 60 receipt-related requests per minute
Retention
Receipts are retained for the lifetime of your account. Consider this your permanent digital receipt archive.
Technical Details
Supported Formats
- JPEG
- PNG
- HEIC (iPhone photos)
HEIC images are automatically converted to JPEG for compatibility.
Matching Algorithm
The automatic matching uses weighted scoring:
- Amount match (40%) - How close the amounts are
- Date proximity (30%) - Days between receipt and transaction
- Merchant similarity (30%) - Fuzzy name matching using Levenshtein distance
A match requires a minimum 70% confidence score.
OCR Quality
If OCR extraction confidence is low:
- You'll see a quality warning
- Consider recapturing with better lighting
- You can manually edit extracted information
Reprocessing Receipts
You can re-run OCR extraction on an existing receipt image to get updated or improved results.
How to Reprocess
- Open the transaction with the receipt attached
- Tap "View Receipt"
- Tap the menu icon (⋮)
- Select "Reprocess Receipt"
- Confirm when prompted
What Happens
- OCR runs again on the original image
- Merchant, amount, and date fields are re-extracted
- New extraction replaces previous values
- The receipt image itself is unchanged
When to Reprocess
OCR got it wrong: If the extracted amount, date, or merchant name is incorrect, reprocessing may yield better results—especially if OCR technology has improved since the original capture.
Initial quality was poor: If the first extraction had low confidence due to image quality, reprocessing can sometimes produce better results on a second pass.
After image enhancement: If you've edited the receipt image externally to improve clarity, re-import and reprocess for better extraction.
Important Notes
Overwrites previous data: Reprocessing replaces previously extracted information. If you've manually edited the merchant name, amount, or date, those edits will be lost.
Confirmation required: Because reprocessing overwrites existing data, you'll be asked to confirm before proceeding.
Original image preserved: The receipt image itself is never modified—only the extracted text data is updated.
May not improve results: If the original image quality is fundamentally poor (blurry, faded, partial), reprocessing won't help. Consider recapturing the receipt with better lighting and focus.
Related Features
- Manual Transactions - Add transactions without receipts
- Tags - Organize receipts for tax purposes
- Searching & Filtering - Find specific receipts
- Viewing Transactions - Work with all transactions